Once a component has been added to your circuit, you may modify the component like any other circuit element using the standard editing commands. You may change the properties of the component by double-clicking on the schematic box, which will open the Component Properties dialog box.
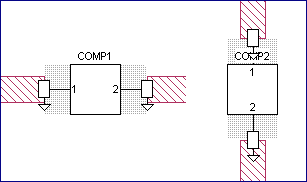
If you rotate a Component, the physical package is also rotated if you have entered the optional physical dimensions. The view on the right is rotated 90 degrees from the left view; notice that the physical package, represented by a gray shadow box, is also rotated.
You may change the location of a component port by clicking on the schematic box and dragging it to the desired location. All component ports move with the schematic box and maintain the same relative positions. If you wish to move one of the component ports of a component, click on the port symbol and drag it to the desired location. All unselected ports and the schematic box maintain their position.
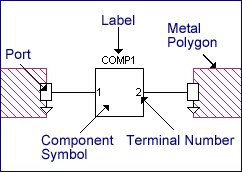
To change the label of a component, double-click on the component to open the Component Properties dialog box, and enter the desired label in the Label text entry box.
To change the size or shape of the component symbol, click on the symbol to select it, then right-click and select the command "Modify Symbol" from the pop-up menu which appears. The symbol will be highlighted as shown below. Click and drag on any point on the symbol to change the shape and/or size.
You cannot change the number of component ports assigned to a component. If you wish to change the number of ports on a component, you need to delete the component in your circuit and add a new one with the number of ports you wish to have.