Installation of Keysight ADS Interface
To install the Keysight ADS Interface perform the following steps:
Select Admin > Third Party Interfaces from the Sonnet Session tab.
The Sonnet Administration dialog box appears on your display, showing the 3rd Party Interfaces page.
If it is not already selected, click the ADS tab in the 3rd Party Interfaces page.
The appearance of the dialog box is updated to display the ADS tab which lists all the versions of ADS which are available.
If there is more than one version of ADS available, select the desired version.
Click the Install button below the list of ADS versions.
A query appears on your display asking if you wish to proceed.
Click the Yes button.
The Keysight ADS Interface is installed. A success message is displayed, and the window is updated to show that it is installed.
Enabling the Sonnet Design Kit
The Sonnet Design Kit must be enabled in a workspace in order to use the Sonnet Keysight ADS Interface in that workspace. You may choose to enable the Sonnet Design Kit in a workspace while creating the workspace or you may enable it later.
While Creating the Workspace
To enable the Sonnet Design Kit in a workspace when you create the workspace, perform the following steps:
In the main ADS window, select File > New > Workspace from the menu.
The New Workspace Wizard appears on your display. If it opens on the Introduction page, please click the Next button.
Enter the desired workspace name and location.
Click the Change Libraries button.
A list of libraries appears on your display.
Select the SONNET_ADS_DK checkbox on the Add Libraries page.
Selecting the SONNET_ADS_DK checkbox automatically selects the User Favorite Libraries and PDKs checkbox, which installs the Sonnet Keysight ADS Interface in this workspace.
Click the OK button.
The Add Libraries dialog box is closed. Note that the Included Libraries entry in the New Workspace dialog box has been updated to display "SONNET_ADS_DK."
Click the Create Workspace button.
This closes the New Workspace dialog box and creates the new workspace with the Sonnet Interface installed.
Enabling an Existing Workspace
To add the Sonnet Design Kit to an existing workspace, perform the following steps:
Open the workspace in the ADS main window.
Select Design Kits > Manage Favorite Design Kits from the menu of the main window.
The Manage Favorite Design Kits dialog box appears on your display. Note that if you have multiple design kits installed, they will also be listed in this dialog box.
Select the Current Workspace checkbox in the SONNET_ADS_DK entry line to select the Sonnet design kit.
A query window appears on your display.
Click the Yes button in the query window.
The window closes and this completes adding the design kit.
Click the Close button in the Manage Favorite Design Kits dialog box.
This closes the dialog box and adds the Sonnet Design Kit to your workspace.
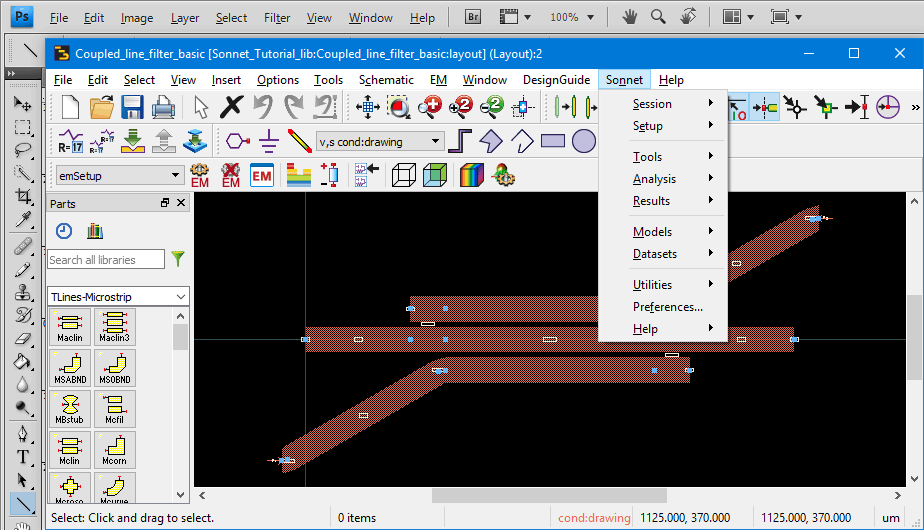
Accessing Sonnet's Keysight ADS Interface
In order to use Sonnet as your electromagnetic analysis engine, you must create a Layout view of the design or a part of a design that you wish to simulate in Sonnet. Once you open the Layout view, you may use the Sonnet menu in the Layout view window to set up and simulate the circuit in Sonnet. The Layout window with the Sonnet menu open is shown below.
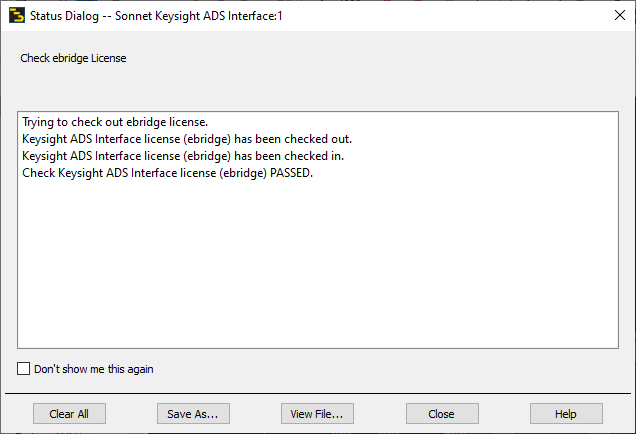
Checking the License
You may check to see if you have a valid Keysight ADS license for Sonnet and your ability to both check a license out and check the license back in. To check for license availability, select Sonnet > Help > Support > Check License from the main menu of the layout window in ADS. The Status Dialog window appears and provides status on the license. Pictured below is a successful license check.
Unlocking a Project
Select Sonnet > Analysis > Unlock Project to unlock a project.
When the EM solver analyzes your project, it "locks" the project to prevent changes to it during simulation. The EM solver will automatically unlock the project when it completes the analysis or you stop the analysis. If for some reason the Sonnet analysis is interrupted in such a way as to prevent a graceful exit, such as a hung program or a program crash, then the project will remain locked. In this case, you may manually unlock it by using this command.
It is important that you conclusively determine that the EM solver is not analyzing your project before you unlock the project. If you perform an unlock while the project is being analyzed, you may corrupt your analysis results.
Status Dialog Window
The Status dialog window displays status messages from Sonnet when using the Keysight ADS Interface. The window displays the status output. If you do not wish to see the status messages, select the Don't show me this again checkbox before closing the window. The status messages are also output to a file which you may access by clicking the View File button.
If you wish to save the status presently displayed in the window, click the Save As button to open a browse window which allows you to save a file on your computer.
To clear the status window and status file, click the Clear All button.