If you wish to set up batch or script files to run your analyses overnight or at times of the day when the processing load is lighter, it is possible to use command lines to run em from a batch file. You should also be aware that it is possible to setup batch files with start and stop times using the job queue tab. For directions on how to do so, please see Timed Start Queue.
You should be aware that running from the command line does not provide all of the status information that is provided in the job queue while running an analysis.
The syntax of the command line is as follows:
em -[options] <project name>
where:
<options> is one or more of the run options shown in the table below. If you use multiple options they can be typed with no spaces in between after the minus sign. Note that other run options may be set in the Analysis Setup dialog box for your project and will be used during the analysis.
Option |
Meaning |
-Dlicense |
Used for debugging em licensing problems. Displays all environment information relevant to licensing. |
-N |
Display number of subsections and estimated required memory. Em then exits without running a full analysis. |
-test |
Run em on a test circuit. Used to verify that em can get a license and run successfully. |
-v |
Display analysis information as the analysis is performed. The analysis information is output to the command prompt window or terminal from which the batch was executed. |
-Lossless |
Perform simulation as if the entire circuit is completely lossless. All metal polygons and vias, all dielectric layers, all dielectric bricks, and the Sonnet top and bottom box covers are simulated as if they are lossless. |
-AbsCacheNone |
Disable ABS caching (overrides setting in project file). |
-AbsCacheStopRestart |
Enable ABS stop-restart caching (overrides setting in project file). |
-AbsCacheMultiSweep |
Enable ABS multi-sweep plus stop-restart caching (overrides project file). |
-AbsNoDiscrete |
Used when running ABS with pre-existing cache data. Tells the analysis engine not to do any more discrete frequencies. If pre-existing cache data is sufficient to get converged ABS solution, then that solution is written to output. Otherwise, no processing is performed. |
-SubFreqHz[value] |
where [value] is the subsectioning frequency in Hz. Note there is no space before the value field. This option allows subsectioning frequency to be specified on the command line, thereby overriding the settings in the project file. |
-ParamFile <filename> |
where <filename> is the name of a file which contains the value(s) which you wish to use for parameter(s) in the circuit being analyzed. These values override the value contained in the geometry project for the analysis, but do not change the contents of the geometry project. The syntax for the parameter file is <parname>=fnum where <parname> is the name of the parameter and fnum is a floating point number which defines the value of the parameter for the analysis. |
<project name> is the name of the project which you wish to analyze. If there is no extension, then the extension “.son” is assumed. This field is required.
For example, if you wish to analyze the project steps.son in a batch file using the -v option, the command line would be:
em -v steps.son
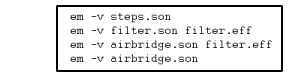
An example of a batch file which runs multiple analyses is shown below.
To execute a batch file on the PC, you should create a text file containing the command lines with a “.bat” extension. Then open a DOS prompt window and type the filename at the prompt and press return.
To execute a batch file on Linux, create a text file containing the command lines. The filename does not need any extension. Then change the permissions mode of the file to allow you to execute it. For example:
chmod a+x <filename>
where <filename> is the name of the batch file you wish to execute. Then, type the name of the file at the Linux prompt and press return.
On Linux systems there are several additions to the command line which are useful to know. Placing “nice” before the command runs it at lower priority. Placing “&” at the end of the command runs it in background, so you get your cursor back. Entering “nohup” before the command line allows you to log off while the em job(s) keep running. If you are using the “&” or the “nohup”, you might want to consider redirecting the output using “> outfile.” See your system administrator for details on any of these options.
If you wish to export data from a Sonnet analysis to be used in a time domain tool, you may wish to use causal dielectrics. Using a causal dielectric will vary the properties of the dielectric layer - the relative dielectric constant, the dielectric loss tangent, and the dielectric conductivity- slightly over a frequency band. The variations are modeled using Debye functions based on a reference frequency1. The reference frequency is the frequency at which the values entered for the properties are known to be accurate based on obtained measurements or given by the manufacturer. The options to use causal dielectrics are provided below.
Option |
Meaning |
-CausalDielectrics<freq> |
where <freq> is the reference frequency in Hz at which you know the values for the dielectric properties are accurate. For example if your reference frequency is 3.0e9 Hz than the option you enter would be -CausalDielectrics3.0e9. |
-CausalDielectrics |
Use this option if you do not know the reference frequency. In this case, the analysis engine uses the average of the minimum and maximum analysis frequencies to obtain a reference frequency. |
1For a detailed technical discussion of Causal Dielectrics and the use of Debye functions in modeling them, please see the following article:
Morgan, Chad, “Solutions for Causal Modeling and A Technique for Measuring Causal, Broadband Dielectric Properties,” DesignCon 2008, February 4 - 7, 2008.