A netlist project contains a netlist which consists of one or more networks with elements connected together. The netlist provides a map in which the ports of individual elements in the netlist are connected to the ports of other elements by the use of nodes. Nodes represent a connection between netlist elements. In other words, you use ports in your circuits to define connections, but you use nodes in a netlist. In order to connect a circuit in a netlist, you must assign its ports to nodes in the netlist. This is done when you define the circuit as an element in a netlist.
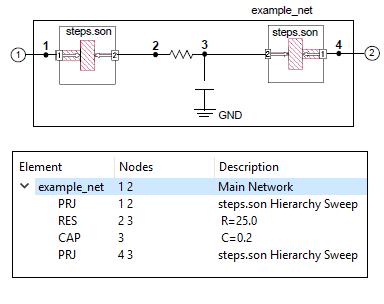
The picture above shows the network represented by the netlist shown in the project editor below it. The nodes are represented by the numbered black dots. The geometry project, steps.son, is connected between nodes 1 and 2 with node 1 corresponding to Port 1 in the geometry project and node 2 corresponding to Port 2. A resistor is connected between nodes 2 and 3. A capacitor is connected between node 3 and ground. The project steps.son is also connected between nodes 3 and 4, with Port 1 corresponding to node 4 and Port 2 corresponding to node 3. Port 1 of the network example_net corresponds to node 1 and port 2 of the network corresponds to node 4.
A netlist project is simply a list of these elements, as you can see in the netlist pictured above. Notice that the first number after the name of the element is the network node which corresponds to port 1 of the element, the second number is the network node which corresponds to port 2 of the element, and so on, for all the ports in an element.
The sequence of steps for a netlist project analysis may be summarized as follows:
Note that the above sequence of steps is generalized for analyses which include both electromagnetic and circuit analysis. In cases where the overall analysis is restricted to either electromagnetic analysis or circuit analysis, some of the steps are omitted.