The Sonnet Dielectric Setup dialog box allows you to define the dielectric layers and metal levels for your Sonnet project. Once these dielectrics are defined, they may be used as a destination for layers being mapped from ADS. The Sonnet Dielectric Setup dialog box, shown below, is opened when you click on the Dielectrics button in the Substrate File Setup dialog box. 
The dielectric layers are listed in the dialog box. Sonnet circuit geometry consists of alternate dielectric layers and metal levels enclosed in a six-sided metal box. Each time you add a dielectric layer you add a metal level.
It is important to note that the metal level is associated with the dielectric layer ABOVE it. If that dielectric layer is deleted from the circuit, then the metalization below it is also deleted and this will change the ADS to Sonnet mapping. The default for a Sonnet project is a two layer circuit with two metal levels GND and Level 0. 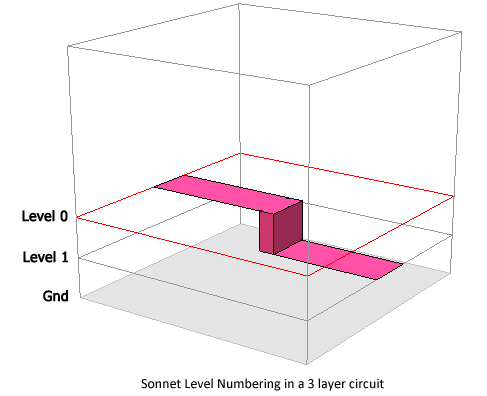
To add a dielectric layer, click on an existing dielectric layer in the list, then enter the parameters for the layer you wish to add. The type of dielectric is specified for each dielectric layer by entering the dielectric constant and loss parameters in this dialog box. For details about these parameters, see Dielectric Layers. Once you have entered the desired parameters, click on the Add button to add a dielectric layer. The new layer will be added BELOW the layer presently selected in the layer list. If you wish to move the location of the layer, select the layer in the list, then click on the Move Up or Move Down button in the Layer Setup dialog box to change this layer’s position in the circuit.
#: This is the number of the dielectric layer. You may not edit this value. The positions of layers must be changed using the Move Up or Move Down buttons.
Name: Enter the desired name for the dielectric material to be used in the layer here.
Conductivity: Dielectric conductivity, s, where s is the conductivity of the dielectric. The default unit is S/m. You may define your dielectric loss using conductivity or resistivity. To use conductivity, you should select “Conductivity” from the Specify Using drop list.
Resistivity: Resistivity = 1.0 / conductivity. Resistivity has a default unit of Ohm-cm.You may define your dielectric loss using conductivity or resistivity. To use resistivity, you should select “Resistivity” from the Specify Using drop list.
Thickness: Enter the desired thickness of the dielectric layer here.
Erel: Enter the relative dielectric constant here.
DLoss: Enter the dielectric loss tangent here.
Cond (S/M): Enter the dielectric conductivity here.
Mrel: Enter the relative magnetic permeability here.
MLoss: Enter the magnetic loss tangent here.
When you click on the Add button, the entry for this dielectric layer is updated in the Sonnet Dielectric Setup dialog box.
If you wish to edit the parameters of a dielectric layer, click on its entry in the list, then edit the values on the right-hand side of the dialog box. The table is updated by clicking the tab or enter button. To delete a dielectric, click on the desired dielectric, then click on the Delete button. To delete all dielectrics, click on the Clear All button. This deletes all the dielectrics except GND and zero, which will be set to the default values. For a list of all dielectric layers and their properties, click on the Summary button. This will open a window containing details about all the dielectrics. If you need to keep a hardcopy of the list, you may click on the Print button.
When you have completed adding or changing dielectric layers, click on the OK button to apply the changes and close the dialog box.