This starts the input of the GDSII file. A browse window appears on your display.
This is the GDSII file supplied as part of your example for this tutorial.
The Import Wizard is opened on your display. The Import Wizard walks you through the process of importing a file. The first page is the Import File page.
The Import to New Project option is already selected by default with the default name of the GDSII file basename with the .son extension. These entries do not need changing.
The text entry box and Browse button just below the option are enabled.
A browse window is opened on your display.
This is the template you finished creating in the last section of the tutorial.
Selecting this checkbox creates Technology Layers using the mapping defined in the template file for the GDSII streams and datatypes. The dialog box should now appear as shown below.
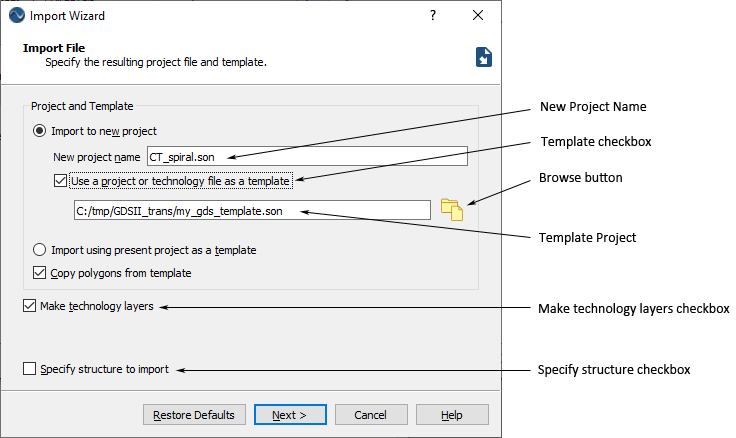
Our example GDSII file only contains one structure, so there is no need to specify a structure. For GDSII files with multiple structures, if you do not wish to translate the parent structure, you can click on the Specify structure to import checkbox. In that case, the next page in the Wizard would allow you to select the desired structure.
The Import Layer Mapping page of the Import Wizard appears on your display.
The settings in the Layer Mapping dialog have been filled in with information from the template project. As shown earlier in the tutorial, when the technology layers were defined for the template, the technology layers were mapped to a GDSII stream. So when the import is executed, if a technology layer is defined in the template that is assigned to an incoming stream, then that stream is placed in that technology layer. This information is used to populate the Import Layer Mapping page settings.
Notice that Technology Layers that were defined and assigned to GDSII streams and datatypes are mapped and the information from the technology layer appears in the Sonnet fields. Because the Object Type, Level and Material are associated with a technology layer, they are displayed but you may not edit them. Any changes would need to be made in the technology layer settings in the translated project or in your template file.
The second entry in the layer mapping dialog box for GDSII stream 31:1 is not mapped because there was no GDSII stream 31:1 in the template file. Only streams included in the template file are mapped. If you use the scroll bar on the right hand side and scroll down, you can see more streams that were not mapped because they also were not present in the template file. This is a common scenario. For example, streams may be used for text or other drawing artifacts which do not correspond to physical polygons in the circuit. If you wished to also map any of these streams, you may edit the settings for that entry.
As you can see, the template file saves you from having to manually enter all of your mapping settings. If you are doing multiple imports, then a template file can prove very useful. There is no need to make any changes to the Import Layer Mapping settings.
The Import Options page appears on your display.