This section of the manual describes the normal design flow for using the Cadence Virtuoso Interface to set up and run an electromagnetic analysis using Sonnet’s analysis engine, em. This provides a general outline, but be aware that every step does not need to be done for every analysis. Oftentimes, the default values are already set correctly and no action needs to be taken for that step. Detailed descriptions of the functions of all the controls are found in Help, accessed by selecting Sonnet - Help from the Sonnet menu in the Cadence Virtuoso CIW, layout window or Sonnet’s Cadence Virtuoso Interface main window. You may access specific topics in Help by clicking on the Help button in any dialog box in the Cadence Virtuoso Interface. For a detailed, step by step example, please see the tutorial.
In order to use Sonnet as your electromagnetic simulator you must create a SonnetEM View from a layout view of a cell in Virtuoso.
The definition of a “cell” in the Cadence Virtuoso environment is equivalent to the “circuit geometry” in Sonnet. When “cell” is used in the Sonnet environment, it is referring to the smallest part of the analysis grid used in subsectioning your circuit.
You create a SonnetEM view by opening the desired cell’s layout view in Virtuoso, then loading the Sonnet menu (Launch - Sonnet). Once the Sonnet menu appears in the layout window, you select Sonnet - Create SonnetEM view to open the Create SonnetEM view from Layout View dialog box which allows you to create the SonnetEM view.
Once you have created the SonnetEM View, that view is opened along with the Cadence Virtuoso Interface. To open the interface after the SonnetEM view has been created, open the SonnetEM view in a layout window, load the Sonnet menu (Launch - Sonnet), then select Sonnet - Open Interface Application to open the interface.
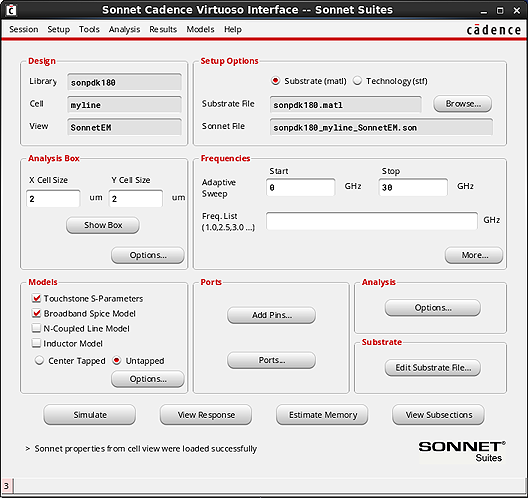
This opens the Cadence Virtuoso Interface which allows you to setup and run an analysis for the circuit shown in the SonnetEM view. The Cadence Virtuoso Interface main window, shown below, is used to perform the rest of the tasks in the design flow.
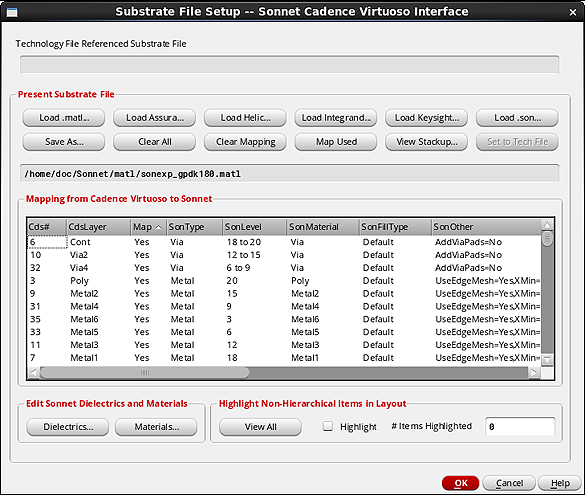
You need to define the layer mapping from Virtuoso to Sonnet, and the dielectric layers and materials to be used in your Sonnet analysis. You use the Substrate File Setup dialog box, shown below, to control these settings. You open the dialog box by clicking on the Edit Substrate button in the Substrate section of the Cadence Virtuoso Interface. For a detailed explanation of the controls and settings, please click on the Help button in the Substrate File Setup dialog box or on the link above.
Sonnet's analysis engine, em, analyzes planar structures inside a six-sided metal shielding box; therefore, the box needs to be specified. Port connections are usually made at the box sidewalls. The substrate is on the metal bottom of the box and represents the ground plane. Above the substrate are stacked the dielectric layers and metal levels. The side walls of the box are modeled as lossless metal. The top and bottom of the box may be assigned any metal type defined in the geometry project.
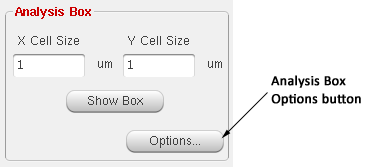
You use the Analysis Box Options dialog box to control these settings. You open the dialog box by clicking on the Options button in the Analysis Box section of the Cadence Virtuoso Interface main window.
Click on the Help button in the Analysis Box Options dialog box, or the link above, for details on the settings. For more information on the box, see Sonnet Box.
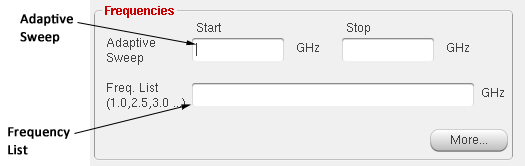
You are able to set up multiple frequency sweeps for your Sonnet analysis using the Frequencies section of the main interface window. You may enter an Adaptive Band Sweep (ABS) or list of frequencies directly in the main interface window, as pictured below. Other types of sweeps must be entered in the Frequencies dialog box opened by clicking on the More button in the Frequencies section of the interface.
If the only types of frequency sweeps entered are the Adaptive Sweep and/or list of Frequencies, then the sweeps are displayed on the main page. If you enter additional frequency sweeps in the Frequencies dialog box then all of the sweeps defined for your analysis are displayed in the Frequencies dialog box. In that case, a message appears in the main interface directing you to the Frequencies dialog box.
Click on the Help button in the Frequencies dialog box, or on the link above, for details on the different types of frequency sweeps and settings.
The Models section of the Sonnet Cadence Virtuoso Interface, shown below, allows you to select the type of model(s) you wish to produce when you run your Sonnet EM analysis. There are four different types of models available in the main interface window: S-Parameters in Touchstone format, a Broadband Spice model in Spectre format, a N-Coupled Line model, and an Inductor model. Additionally, you may select S-Parameters in Spectre format in the Advanced Model Options dialog box, opened when you click on the Options button.
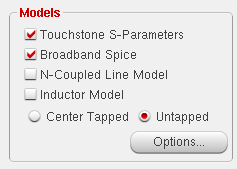
You may chose to produce any or all of the models by selecting the appropriate checkboxes. You may also choose to create no models at all.
If you do not create models as part of your simulation, it is possible to create the model views afterwards using the Models menu in the Sonnet Cadence Virtuoso Interface, but only if the raw data is available.
Click on the Help button in the Advanced Model Options dialog boxAdvanced Model Options dialog box, or click on the link, for details on the different types of models and their settings.
You need to specify the parameters for the ports to be used in Sonnet and the use of reference planes. Virtuoso pins are converted to Sonnet ports. All pin types, with the exception of symbolic, may be used in Virtuoso when you are using Sonnet as your electromagnetic solver. Pins can be converted to standard box-wall ports, co-calibrated ports, delta gap ports, and via ports.
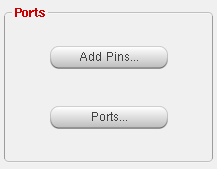
The Ports section of the main interface window provides a shortcut to Cadence Virtuoso’s Create Shape Pin dialog box and access to the Ports dialog box. Clicking on the Add Pins button opens the Create Shape Pin dialog box and clicking on the Ports button opens the Ports dialog box. When a Pin is added, it is automatically converted to a Sonnet port. You may add the shape pins before creating the SonnetEm View or add them in the SonnetEm View using the Add Pins button. For more information on the Create Shape Pin dialog box, please refer to Cadence Virtuoso’s help.
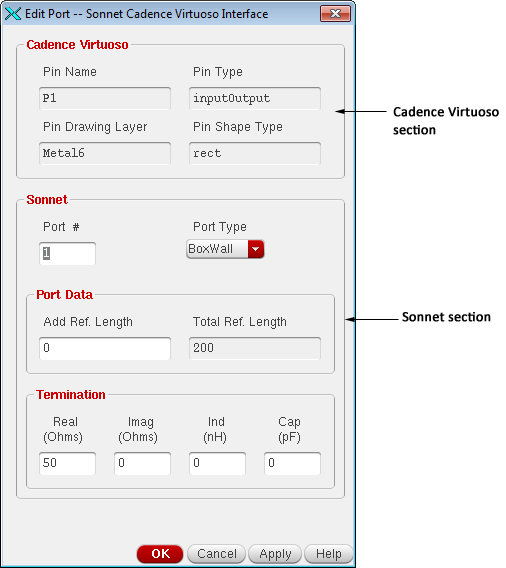
Once the pins have been added, they are automatically converted to Sonnet Ports. To change the parameters of the ports, you click on the Ports button to open the Ports dialog box. For more information on ports and their parameters, please click on the Help button in the Ports dialog box, or on the link. Click on a port to select it and then click the Edit button to edit that port. The Edit Port dialog box appears.
The next section of the main interface window is the Analysis section which allows you to control the settings and run options for the analysis engine, em. Clicking on the Options button opens the Analysis Options dialog box.
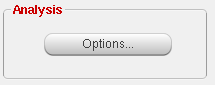
For a detailed discussion of the analysis options, please click on the Help button in the Analysis Options dialog box or on the link above.
There are three commands available in the Cadence Virtuoso Interface that allow you to check your circuit before running an analysis: Estimate Memory, Estimate Box Resonances and Check Connectivity. Analysis - Estimate memory subsections your circuit and estimates the memory required for the analysis. Analysis - Estimate Box Resonances allows you to detect possible box resonances before running your simulation. Tools - Check Connectivity opens your circuit in the project editor so that you can check for any opens or shorts in your circuit that might have been created during the translation.
For more information about these commands, click on the links.
You may run your analysis by clicking on the Simulate button in the main interface window or by selecting Analysis - Simulate from the main menu of the interface window.
For longer analysis runs, you may want to make the license for the Sonnet Cadence Virtuoso interface available in order to work on another project or to allow another user access to the interface. In those cases, you can use the command Analysis - Simulate and Release to run your analysis.
For more information about these commands, click on the links.