Sonnet EM Co-Simulation (SEC) Tutorial
Sonnet's EM Co-Simulation (SEC) for ADS allows you to perform EM Co-simulation from within the ADS Analog/RF simulation engine. An SEC component placed within the ADS schematic can invoke Sonnet EM simulations and allows the user to tune or optimize a parameterized Sonnet project from the ADS design environment.
This tutorial provides you with an example of how to create an SEC component and then shows how to use the component when tuning and optimizing in ADS. It assumes you have already installed the Sonnet Keysight ADS Interface.
Copy the SEC Example
You need to copy the example sec_filter to your working directory using the Example Browser.The example contains an archived workspace that is used for this tutorial. The workspace contains two test bench cells for Optimization and Tuning, and two data displays for Optimization and Tuning. The source project for the SEC component is included in the main workspace folder.
Open Sonnet.
Select Help > Browse Examples from any Sonnet tab.
The Example Browser opens.
Find the SEC Filter Tutorial (called sec_filter) and select it.
You may use the search box or scroll down until you see the sec_filter example.
Click the Save button at the bottom of the Example Browser window.
A Save Example window opens.
Enter or browse for the folder where you wish to place the example.
Choose a location you can remember.
Click the Save button.
The example is saved to the specified folder.
Click the Close button.
The Example Browser closes.
Add Design Kit to Workspace
You now need to unarchive the archived workspace and prepare it for use with Sonnet.
Open ADS.
Unarchive the archived workspace (Sonnet_SEC_Filter_wrk.7zads).
The Sonnet Design Kit is installed in ADS when you installed the interface, but you must add the design kit to your workspace.
Select Design Kits > Manage Favorite Design Kits from the main menu of the ADS main window.
The Manage Favorite Design Kits dialog box appears on your display.
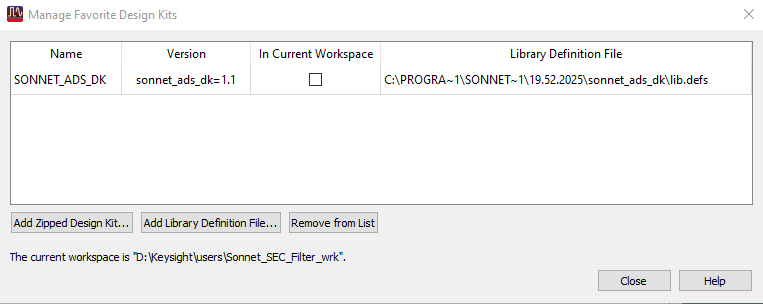
Select the In Current Workspace checkbox.
Selecting this checkbox adds the identified Library Definition File to your workspace. When you select the checkbox, a query box appears asking if you wish to add the design kit to the workspace.
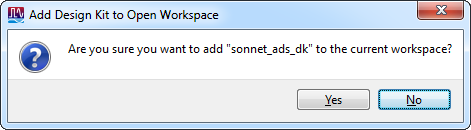
Click the Yes button.
The query box is closed, and the checkbox shows the design kit is in your workspace. Adding the Sonnet design kit to your workspace ensures that the Sonnet menu appears in your layout and schematic windows so you can access the Sonnet interface. Note that this process must be repeated for every workspace.
Click the Close button to close the Manage Favorite Design Kits window.
Create the SEC Component
In order to use SEC, you must create an SEC component and place it in the schematic in which you wish to use the Sonnet project.
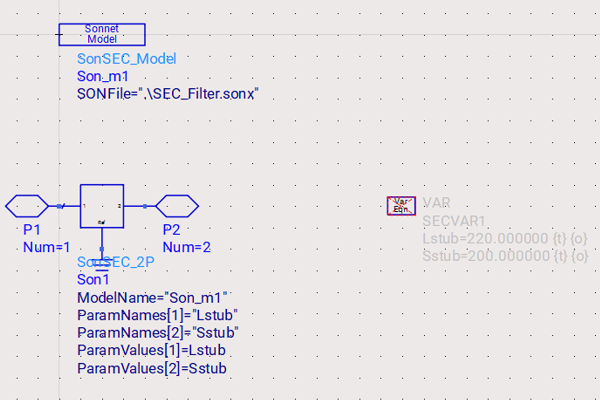
Open the ADS schematic view of cell "Tune_SEC_Filter".
The ADS schematic window appears on your display. The schematic provides a simple test bench with the S-parameter block defined and an opening in the circuit for the SEC Component. This is useful to demonstrate using the SEC feature. Actual designs in which you would use SEC components will be more complex than the schematic used here.
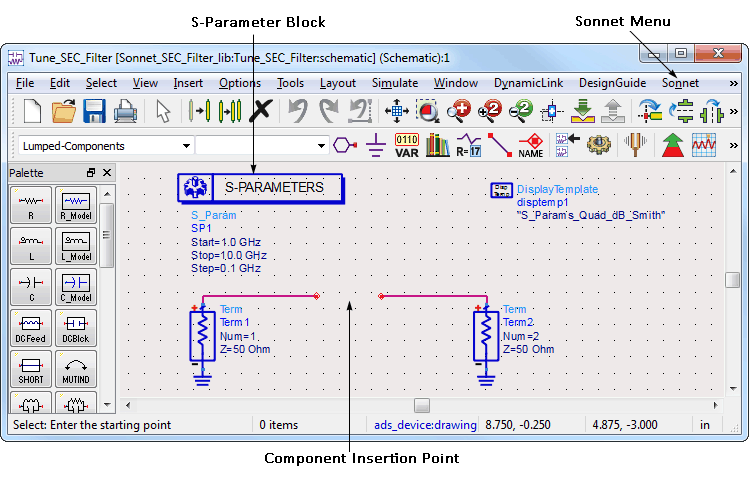
Note that the schematic contains an S-parameter block. Your schematic must contain an S-parameter block in order to create an SEC component. If you do not have an S-parameter block, when you attempt to create the SEC component, the error message "Unable to create and setup the SEC wizard dialog" is displayed.
Select Sonnet > EM Co-sim (SEC) > Create SEC Component from the main menu of the ADS schematic window.
The EM Co-Simulation SEC Model Wizard appears on your display.
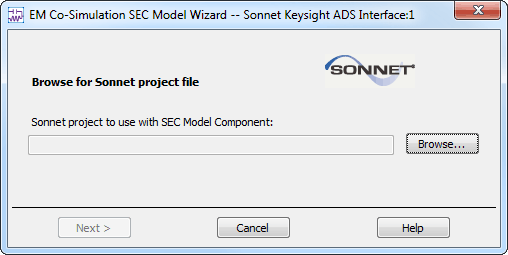
The first page of the wizard allows you to specify the Sonnet source project to use for your SEC component. For the purposes of the tutorial, the source Sonnet project was stored in the main workspace directory. It is not required that the source project be in the main workspace directory, nor will it normally be there. When you specify the project, a copy is created in the workspace so that you do not change the source project.
The copy created in the workspace in the sonnet folder is the project you edit and use in your simulations.
Click the Browse button and select the project SEC_Filter.sonx in the main workspace directory.
The source project is located. A message box appears indicating that a copy of the project will be added to your workspace.
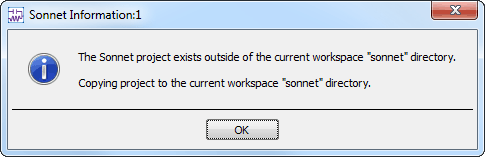
Click the OK button to close the message box and copy the project.
A Status Dialog window appears with messages about the copy process. If you do not wish to see the Status dialog you may select the Don't show me this again checkbox before you close the Status Dialog.
The wizard is updated to display the selected project.
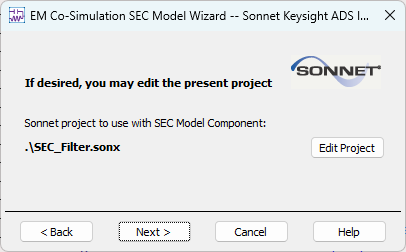
Edit the Sonnet Project
You may need to make changes to your Sonnet project before running simulations using your component. If so, you may do so while creating your component. It is also possible to edit the project after creating the component.
Our example project is already set up to run a Sonnet analysis with two parameterized dimensions. But in order to perform the tuning and optimization in ADS, you need to enable tuning and optimization for the variables associated with the parameterized dimensions. To do so, you edit the project during the setup of the SEC component.
Open the Project in the Project Editor
Click the Edit Project button in the SEC Model Wizard.
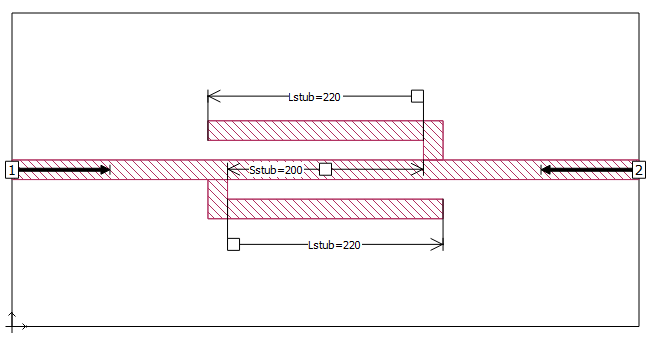
The SEC_Filter project is opened in Sonnet. The image below shows the layout of the example. We have deliberately chosen a simple example to more clearly demonstrate Sonnet’s methodology. It is a simple microstrip band-stop filter. The lengths of the stubs are parameterized using Dimension Parameters with values defined with the variable, "Lstub". Another Dimension Parameter uses the variable "Sstub" to control the distance between the stubs.
Set Up Variables
You need to set up the variables for tuning and optimization. Lstub's tuning range should be from 120 to 320 mils in steps of 5 mils and it's optimization range should be from 120 mils to 280 mils. Sstub's tuning range should be from 120 to 300 in steps of 20 and it's optimization range should be from 120 to 300.
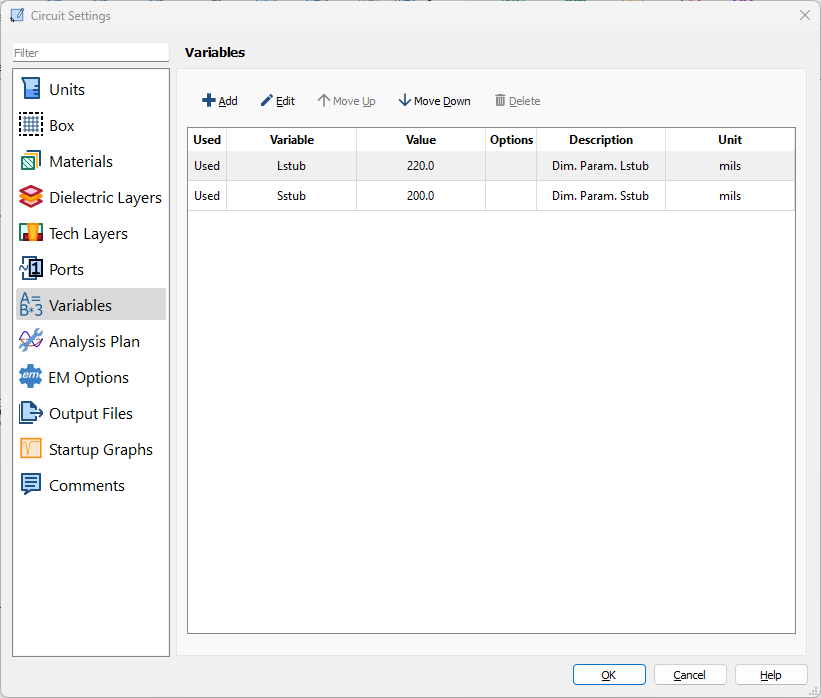
Select Circuit > Settings > [Variables].
The Variables pane shows the two variables used in this project: Lstub, and Sstub.
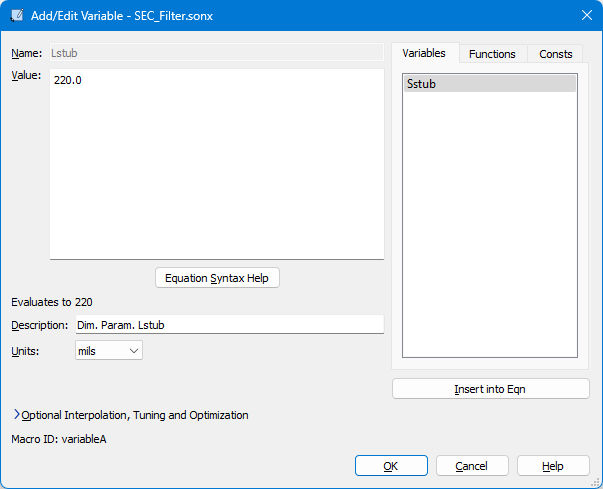
Double-click the Lstub entry.
The Add/Edit Variable dialog box opens.
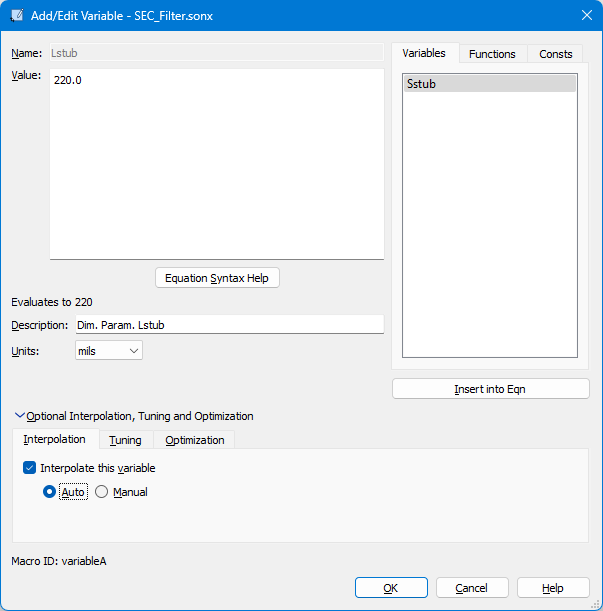
If it is not already open, click the arrow to expand the Interpolation, Tuning and Optimization controls.
The section is expanded with the interpolation tab selected.
Select the Interpolate this variable checkbox.
This enables interpolation for this variable. When interpolation is enabled, a set of values is defined at which the EM solver performs a full electromagnetic simulation. For all other values, the EM solver performs a linear interpolation. This can reduce the number of full analyses that the EM solver needs to run when tuning or optimizing a variable. Interpolation can also help prevent stopping in a local minimum rather than the global minimum when optimizing.
Leave the Interpolation type set to Auto.
The Auto interpolation type automatically sets the interpolation resolution of Lstub to the cell size, which is 5 mils.
Click the Tuning tab.
The tuning controls are displayed.
Select the Allow tuning of this variable checkbox to enable tuning of Lstub.
The rest of the controls in this section are enabled.
Enter "120" in the Minimum text entry box, "320" in the Maximum text entry box and "5" in the Step text entry box.
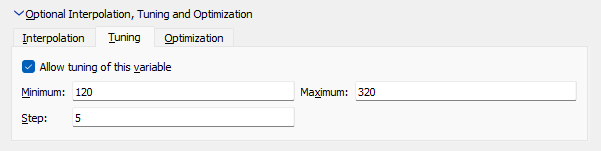
These values set the parameters for the tuning bar in ADS.
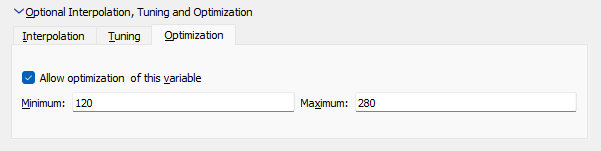
Select the Optimization tab.
The optimization controls are displayed.
Select the Allow optimization of this variable checkbox to enable optimization of Lstub.
The rest of the controls in this section are enabled.
Enter "120" in the Minimum text entry box and "280" in the Maximum text entry box.
These values set the limits of the variable Lstub during an optimization. The range of the variable is 120 mils to 280 mils; only values in this range are used for the variable during the optimization.
This completes the setup of Lstub.
Click OK to close the dialog box and apply the changes.
Note that the Lstub entry on the Variable page of the Circuit Settings dialog box is updated. "I, T, O" appears in the options column to indicate that interpolation, tuning and optimization are enabled for the variable.

Repeat the steps above for Sstub, using the following information:
- Tuning/Optimization Minimum: 120
- Tuning/Optimization Maximum: 300
- Tuning Step: 20
Set up Frequency Sweep
You will analyze the project using an ABS sweep from 2.0 GHz to 8.0 GHz. An ABS sweep provides approximately 300 data points across the band by analyzing at a small number of discrete frequencies.
Click the Analysis Plan button in the sidebar menu of the Circuit Settings dialog box.
The appearance of the Circuit Settings dialog box is updated and shows that the frequency sweep has already been set up in this project. No action is necessary.
Click the OK button in the Circuit Settings dialog box.
The Circuit Settings dialog box is closed and your changes are applied.
Save the Project
You need to save the project before exiting Sonnet.
Select File > Save from the main menu of the Project Editor.
This saves the project. As mentioned earlier, you are working with a copy of the source project. This copy is located in the sonnet folder in the workspace. The original source project has not been modified.
Select File > Exit to close Sonnet.
The Sonnet window is closed and you may now continue creating the component in the wizard in ADS.
Set Up Cell Model Symbol View
You return to the Edit Project page of the EM Co-simulation SEC Model Wizard.
Click the Next button to continue the wizard.
The Modify SEC Model Cell symbol view page of the wizard is displayed. This page allows you to specify the appearance of the symbol used for the SEC model in your ADS schematic.
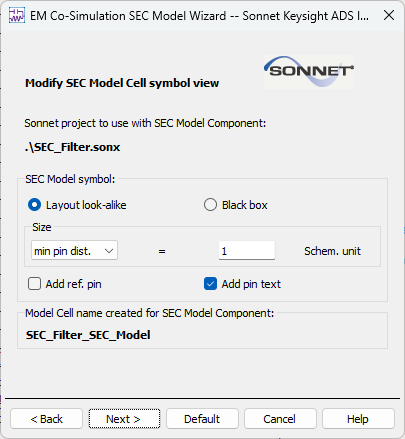
You may choose a Layout look-alike or black box symbol for your mode. Layout look-alike is the default and displays a thumbnail of the circuit in the schematic. The Model Cell name is automatically generated using your source project's basename with "_SEC_Model" appended and is displayed on this page of the wizard.
This tutorial uses all the default settings for this page, so no further action needs to be taken.
Click the Next button to continue the wizard.
This page allows you to turn on/off interpolation for each variable in the Sonnet Project shown below.
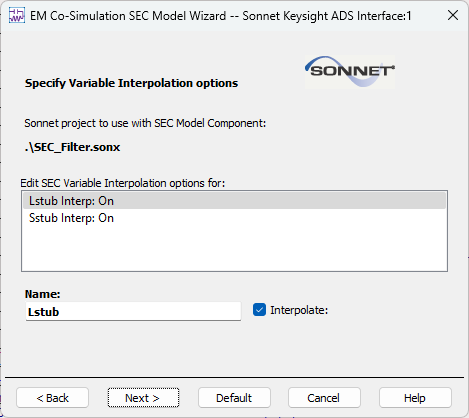
By clicking on a variable in the table, it appears below and allows you to either enable or disable the interpolation feature for that variable. For this tutorial, please verify that interpolation is on for both the variables (Lstub and Sstub).
Set Up Model Options
Click the Next button to continue the wizard.
The Specify Model Options page of the wizard is displayed. This page allows you to define the sweep controls used for the Sonnet project when the simulation is run.

You can choose to use the sweeps set up in your schematic or use a Smart Sweep, the recommended method. The Smart Sweep uses either the sweeps set up in the Sonnet project, shown to the right of the radio buttons, or sets up an ABS sweep over the frequency band specified in the sweeps from your schematic.
If you turn Smart Sweep off, then a full EM analysis is run at each frequency specified in the schematic, and depending on the number of frequencies, can use significant processing time. An ABS sweep provides a fine resolution response for a frequency band requiring only a small number of full analysis points. Smart Sweep is usually the most efficient way to obtain response data for your SEC model.
In this example, the frequency band defined in the project is from 2.0 GHz to 8.0 GHz, but the band in the schematic is from 1.0 to 10.0 GHz, so you need to sweep from 1 - 10 GHz to ensure you create the data you need for the simulation in ADS. In order to take advantage of the efficiency of ABS, Smart Sweep is chosen. Since you are using the default settings, you do not need to change the Smart Sweep settings.
If desired, select the Show detailed Sonnet messages checkbox to select the option.
This option ensures that detailed status messages output from Sonnet are displayed in the ADS status window. If you do not select this option, you still receive only higher level status messages from Sonnet.
Click the Finish button in the wizard.
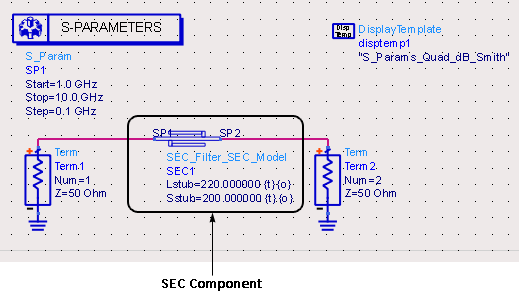
The wizard is closed and the SEC model cell is created and placed in your schematic. Notice that the variable's nominal value is displayed and each entry contains "{t}" and "{o}", indicating that they are available for tuning and optimization.

Drag the component into the gap of the schematic so it is connected to the rest of the circuit.
This completes the test bench circuit. You are now ready to run simulations in ADS that use the SEC component.
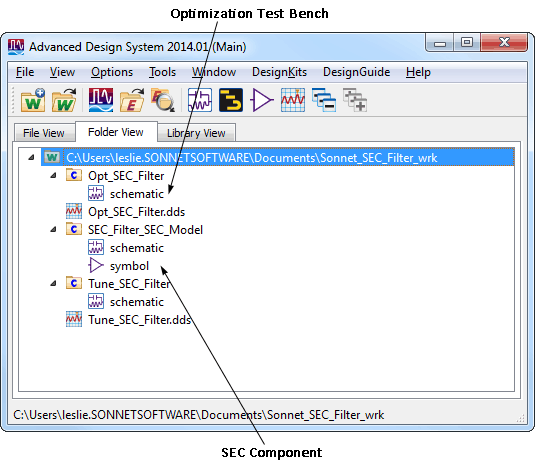
Now that you have created the SEC component, it is available in your workspace library and may be added to any schematic in your workspace. The new cell, SEC_Filter_SEC_Model, appears in your workspace directory and includes a schematic view and symbol view.
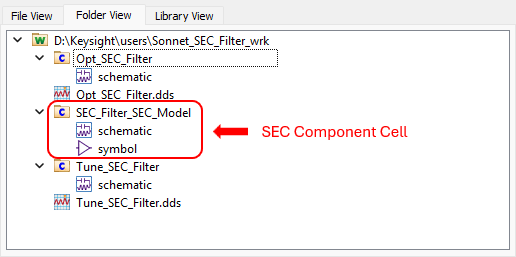
Updated Workspace
Schematic View
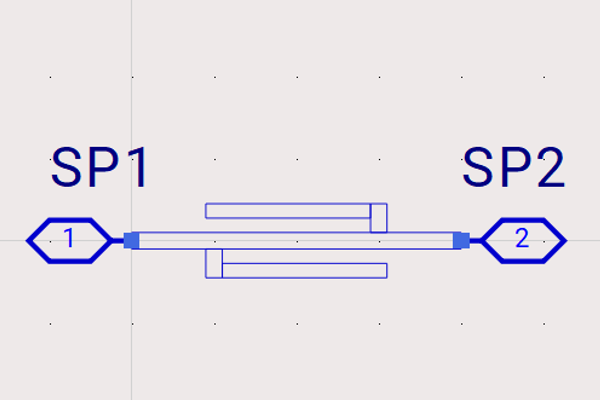
Symbol View
After you have created the component, it is still possible to edit the project being used in the component and the SEC component's settings. To do so, you select Sonnet > EM Co-sim (SEC) > Edit Settings from the menu of a schematic which contains the component. The EM Co-Simulation SEC Model Wizard is opened with the project already specified. You complete the wizard in the same manner just specified, making any desired changes.
Tune in ADS
Tuning allows you to quickly change the value of a variable and see the effect on your response data without re-simulating your schematic in ADS.
Click the Tuning button ![]() in the tool bar of the Tune_SEC_Filter schematic window.
in the tool bar of the Tune_SEC_Filter schematic window.
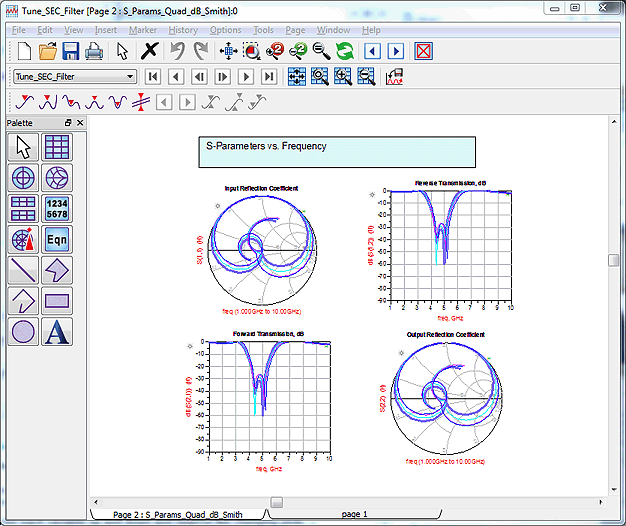
The ADS Simulation Status window is opened and the simulation runs. When the simulation is complete, the Data Display window appears with plotted data. The Tune Parameters window is opened as well.
You may receive a message query from your firewall asking if you wish to allow access for the sonnetsec program; if so, allow the access.
The simulation window displays messages output by Sonnet when the Sonnet project is being analyzed as well as status messages from ADS.
In the Tune Parameters window, select the Snap Slider to Step checkbox.
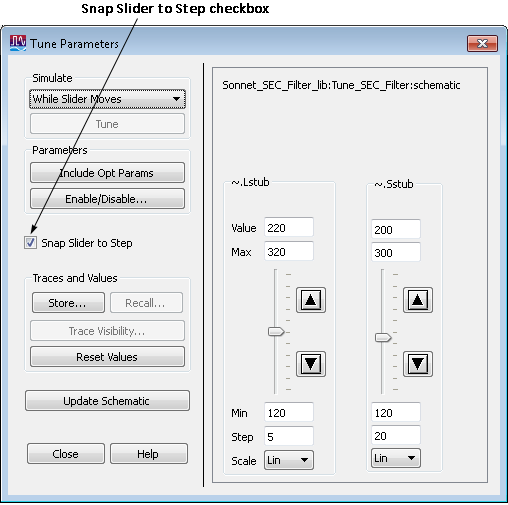
This option means that moving the slider is discretized; it will only increase or decrease the value of the variable by the amount defined by the step. For example, the slider will allow you to set the value of Lstub to 220 and 225, but not 222. This setting is important because if Sonnet response data does not exist at the specified values, then an EM analysis in Sonnet is launched.
In the Data Display window, select History On from the History menu.
This setting displays plots for each value you choose in the Tune Parameters window. This allows you to more easily observe the effect on your output of varying each variable.
Move the sliders for each variable up and down and observe the changing plots.
Initially, response data only exists for the nominal values of the variables which were used in the initial ADS simulation just performed. Each time you move the slider to a new value for which there is not yet simulation data, a Sonnet simulation is launched before the ADS simulation is performed.
In many cases, it might make sense to run a parameter sweep in Sonnet which simulates at all of the values of the variables so that simulations are not done while tuning in ADS. Your workspace includes a Sonnet project SEC_Filter_PreComputed.sonx in the sonnet folder which contains the results of a parameter sweep. Using this for your component will eliminate any Sonnet simulations during your tuning.
The plot below provides an example of the tuning output. Yours may differ depending on what variable values you selected while tuning.
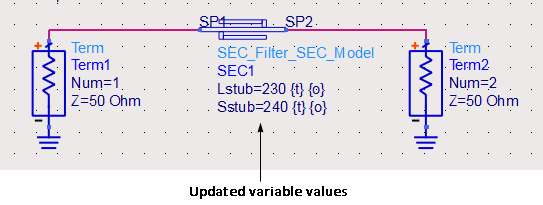
When you are done tuning, click the Update Schematic button in the Tune Parameter dialog box.
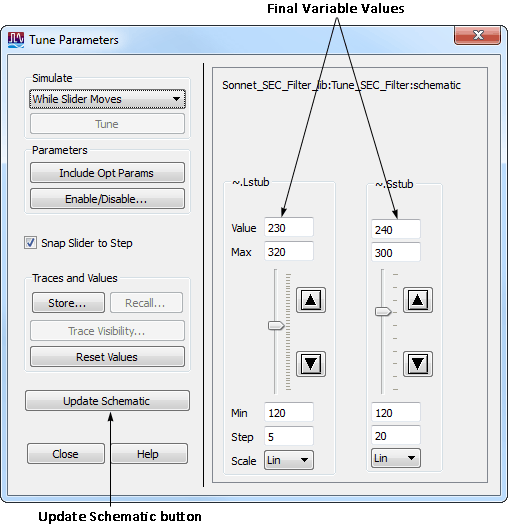
The schematic is updated with the present values of the variables in the Tune Parameters dialog box, as shown below.
Close the Tune Parameters and Data Display windows.
Optimize in ADS
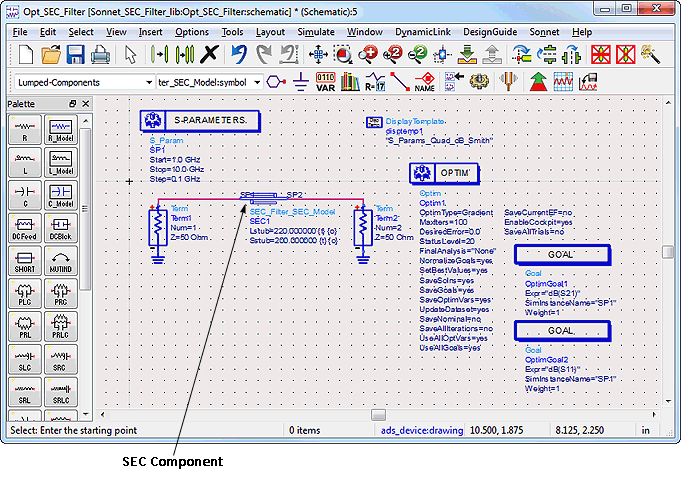
An optimization test bench, Opt_SEC_Filter, has been provided in your example. The Optimization goals are already set up.
Open the Opt_SEC_Filter schematic.
The Opt_SEC_Filter schematic appears on your display.
Place the SEC component into the gap of the schematic so it is connected to the rest of the circuit.
You may drag the component from the main ADS window into the schematic window, then place it in the gap.
Open the Opt_SEC_Filter data display in the Opt_SEC_Filter cell in the workspace.
The data display window appears in your display.
Select History On from the History menu in the data display window.
With the history on, all the calculated data is displayed and you may see the data added as the optimization progresses.
In the Opt_SEC_Filter schematic, click the Optimize button ![]() in the tool bar.
in the tool bar.
The ADS Simulation Status window and Optimization Cockpit are opened on your display. The simulation window displays status messages from both ADS and Sonnet as the Optimization progresses. You may watch the progression of the optimization in the Optimization Cockpit. When the optimization is complete, the optimized values for Lstub and Sstub from the SEC Component are displayed.
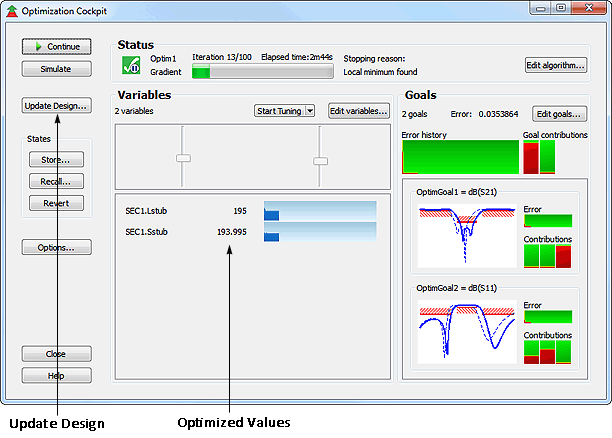
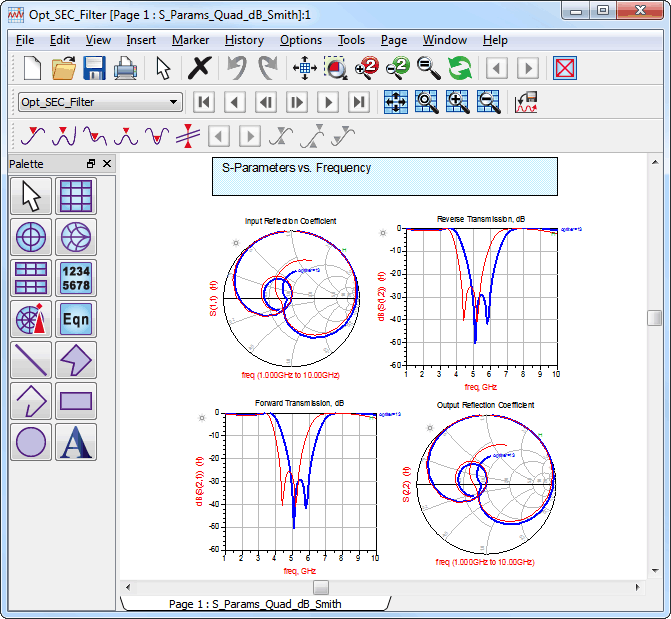
The data display should appear similar to below when the optimization has completed.
Click the Update Design button in the Optimization Cockpit window to accept the optimized values.
A query window appears to ask which items to update.
Click OK in the Update Design window.
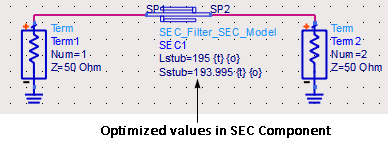
The schematic is updated. Notice that the SEC component now displays the optimized values for the two variables.
This completes the Sonnet EM Co-simulation (SEC) tutorial. However, on the rare situation where you have trouble, the next section can be used to troubleshoot.
Troubleshooting
Selecting Sonnet > EM Co-Sim (SEC) > Start/Stop Sonnet SEC in the Keysight ADS Interface opens a dialog box which allows you to start, stop and test the SEC Server. The SEC server communicates between Keysight ADS and Sonnet for the purpose of translating and analyzing SEC Components. You normally don't need to use this dialog box, but is included in case you have trouble. The following options are available:
Start SEC Server: Click this button to start the SEC server. The status is displayed in the window below the button.
Test SEC Server: Click this button to test the socket and server communications. A small Sonnet project is sent for analysis using the SEC server and the results are transferred back to test the SEC server's functions. The status is displayed in the window below the button.
Stop SEC Server: Click this button to stop the SEC Server. The status is displayed in the window below the button.
Clear All: Click this button if you wish to delete all status messages presently displayed in the status window.