Gerber Translator
The Gerber Translator is only available if you have purchased a "Gerber Import - NETEX-G" (gerbermulti) license from Sonnet and you are using a Windows operating system.
Introduction
The Gerber translator allows you to import PCB designs using Gerber artwork and drill files into a Sonnet project file. It also allows you to export a Sonnet layout into Gerber files.
Import
The Gerber translator allows you to import PCB designs using Gerber artwork and drill files into a Sonnet project file. The import settings can be saved in a job file and used to improve efficiency, with subsequent imports. The Gerber RS274X format is supported.
When you select File > Import > Gerber from the Project Editor menu or Session tab menu, you will be asked if you wish to select artwork and drill files or use a job file. In either case, the Import Wizard is opened. The Netex-G window will be opened as part of the import process.
Once the Gerber files have been imported, you normally need to perform some minor adjustments using the Project Editor.
Export
To output your Sonnet project in a Gerber format, select File > Export > Gerber from the Project Editor main menu. The Export Wizard is opened to perform the conversion.
Netex-G Window
The Netex-G window, shown below, is used to map your Gerber files to a Sonnet project and execute a multi-layer import. It may optionally be used to import a Job file if you wish to change some of the settings in the Job file. It may also used to import an ODB++ archive file or directory.
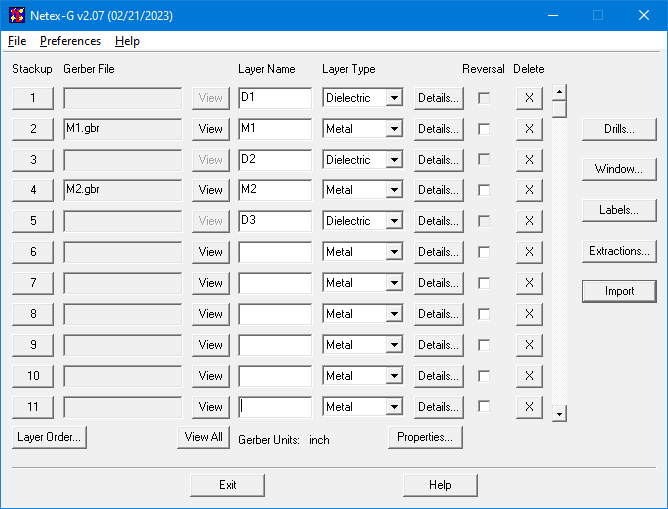
Stackup
You click on the Layer number button in the Netex-G window to assign a file to that layer of the stackup. For example if you wished to assign the file M1.gbr to Stackup level 2, you would click the 2 button, then select the M1.gbr file in the browse window which appears. The name of the assigned file then appears in the Gerber File column.
Gerber File
If you have clicked on a numbered Stackup button and assigned a Gerber file to that Stackup Layer, the file name appears here. You may not directly edit these entries.
View Button
The View button is enabled for a stackup layer if a Gerber file has been assigned to that stackup layer. Clicking this button opens the Gerber Importer window and displays the contents of the assigned Gerber file.
Layer Name
During translation, a material name is generated based on a combination of the Layer Name and the Material name specified in the Layer Details window..
There are three special layer names used to maintain interoperability between Sonnet and the Gerber files:
- SONNET_TOP: If you want vias to go to the top of the box, then a metal layer must be added in Stackup Layer 1. The special name for this layer is SONNET_TOP. This indicates to the translator that this metal level is the box top. Note than any geometry in the Gerber file for this metal layer is completely ignored since metal polygons may not be placed on the box top in Sonnet.
- SONNET_BOT: This indicates to the translator that this metal level is the box bottom or substrate. Note than any geometry in the Gerber file for this metal layer is translated but is effectively meaningless since the whole box bottom is metal.
- SONNET_IGNORE_#: # can be any integer and is used for dielectric layers. If you have two metal layers with different metal properties that you wish to appear on the same metal level in Sonnet, you need to place a SONNET_IGNORE_# command between them so that the translator places the geometries from both Gerber files on the same metal level. Netex-G does not permit you to use different metals on the same layer, so this is the only way you can distinguish the metal types so that their properties can be entered in Netex-G. If you do not insert this “imaginary” dielectric layer in between the metal layers, then all the shapes for both metals will be merged together in Netex-G.
Layer Type
Select the type of layer you wish to use in Sonnet for the corresponding Stackup level. You should select either Metal or Dielectric. Objects in a file entered on a Stackup layer defined as Metal are translated into metal polygons on a Sonnet metal level. Stackup layers defined as Dielectric are translated to a dielectric layer in Sonnet. Note that if Stackup Layer 1 is defined as a metal layer, a dielectric layer of air is added above that metal level during translation as Sonnet requires a dielectric layer between the top metal level and the box top. There is one exception to this rule. By using the special layer name SONNET_TOP, you may define a metal layer as the box top in Sonnet. Please see for more details.
Layer Details
Clicking the Details button opens the Layer Details dialog box which allows you to enter a thickness and metal or dielectric properties for the layer.
We recommend that Sonnet users ignore this button and use Sonnet to specify these properties. After translation, you may select Circuit > Settings and click the Materials and Tech Layers tabs to enter these properties.
Reversal
Select the Reversal checkbox if you have a metal layer that was plotted as a reversal. Typically this occurs for ground and power planes. The program will take this into account when calculating the connections.
Drills Window
Clicking on the Drills button opens the Drills dialog box which allows you to specify a drill file and which levels the drill file should span. For details on using this dialog box, click the Help button.
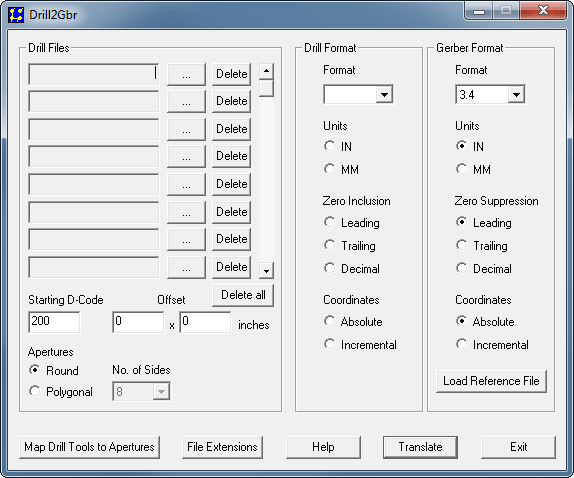
If your drill file is not in Gerber format, you may use the Drill2Gbr utility to convert the drill file to a Gerber format. To open the utility, click on the Drill2Gbr button in the Drills window. For details on using this utility, please click on the Help button.
Window dialog box
If you wish to select only a portion of the Gerber file(s) to import, then click the Window button.
The Window dialog box appears and allows you to select the method by which you set the coordinates for the window whose contents you wish to translate. For Sonnet, you should select the Manual radio button, then click the Launch Gerber Viewer button. This opens the Gerber Importer window which allows you to select a portion of your layout.
Gerber Importer window
The Gerber Importer window allows you to select a portion of the layout to import. It is opened by clicking the Window button on the Netex-G window and clicking the Launch Gerber Viewer button.
When using the Gerber Importer window, you may wish to view a particular metal layer. In order to do so, do the following:
Select File > Layer from the Gerber Importer main menu.
The File Layer Table appears on your display.
Unselect the Show checkbox of any layer obscuring the view of the layer you wish to see.
Click the Apply button to apply the changes.
The view in the Gerber window is updated.
Click the OK button close the Layer Table.
Import button
Once you are ready to import, click the Import button. If this is the first time you have performed this import, you will be prompted to save your settings to a job file (.njb) which may be used in subsequent imports so that you do not have to re-create your setup each time you makes changes in your Gerber source files. A progress window is displayed while the files are being imported. When the translation is complete, control is returned to the Import Wizard in the Project Editor.