Project Editor
The Project Editor allows you to specify all the necessary information concerning the circuit you wish to analyze. There are several ways to open a Project Editor tab in your Session:
- Click the Edit Project button on the Sonnet Task Bar.
- Select File > New Geometry from the main menu in the Session tab.
- Select File > Import from the main menu in the Session tab. A Project Editor tab opens after completing the import.
- Select Launch > Edit Project from the main menu of any other tab in your Session. The active project is opened in a project Editor tab.
- Windows only: Double-click a project file in Windows Explorer.
- Windows only: Right-click a project in Windows Explorer, and select ''Open'' from the pop-up menu which appears.
The default layout for the Project Editor tab is shown below. Your layout may look different if you have customized it.
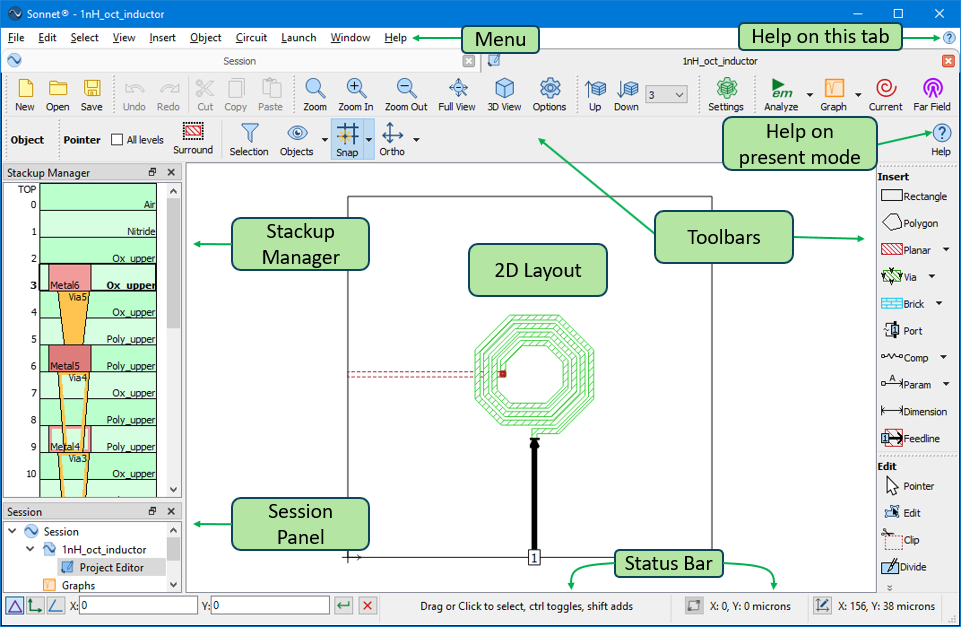
Default Layout for the Project Editor
Each section of the Project Editor tab is explained below.
Main Menu
The main menu contains nearly all commands available in the Project Editor. Toolbar buttons always have an equivalent menu command but not all menu commands have a corresponding toolbar button. The documentation normally uses the menu command when explaining a procedure but the equivalent toolbar button may be used instead. Most of the main menu labels are self-explanatory but the following require further explanation:
- Object: The Object menu contains commands that operate on one or more selected objects. For example, to center a selected polygon in the Analysis Box vertically, select Object > Center > Vertically.
- Circuit: The Circuit menu contains commands that are related to the entire circuit. For example, Circuit > Settings opens the Circuit Settings dialog box, which allows you to add/edit your stackup, frequencies, EM options, etc.
- Launch: The Launch menu is used to open various Sonnet tabs for the present project. For example, Launch > Graph Response > New Graph adds your project to a new Graph tab.
- Window: Sonnet offers you the ability to customize the layout and appearance of your Sonnet windows. See Customizing Sonnet Windows for details.
Help Buttons
There are two types of Help buttons in the Project Editor tab:
Help on this tab: Click the Help button in the top right corner to open a help topic corresponding to the type of tab you have open (in this case, the Project Editor tab).
Help on present mode: Click the Help button in a toolbar to obtain specific help for the present mode. For example, when adding a port, clicking on this Help button opens the documentation on ports.
Stackup Manager
The Stackup Manager provides an overview of the dielectric layers, metal levels and Tech Layers in your project. See Stackup Manager for details.
Session Panel
The Session panel shows a tree view of all your presently opened tabs. See Session Panel for details.
Toolbars
By default, Sonnet displays multiple toolbars using the layout shown in the picture above. Toolbars give you quick access to frequently used commands but do not contain all the commands found in the menus. See Customizing Sonnet Windows for information on moving, hiding, and managing toolbars.
Many toolbars put you in a specific mode, such as adding a polygon or editing points. While in the mode, the toolbar includes three icons as explained in the table below.
| Icon | Description |
 |
Pin Mode: Leaves you in the mode until you explicitly exit the mode by selecting another mode, pressing the Esc key on your keyboard, or clicking the Cancel button. |
 |
Cancel: Cancels the present mode. |
 |
Help: Displays specific help for the present mode. |
Status Bar
The status bar is located at the bottom of the Project Editor window. The contents of the status bar depends on the present mode. The center section contains instructions for your present mode, and the right section contains coordinates of your cursor. If a polygon is selected, the size of the bounding box of the polygon is also shown in the status bar.
Keyboard Entry
Keyboard entry may be used with many editing commands, including adding and moving polygons and points and moving Components. When an object is selected, the keyboard entry controls appear in the status bar of the Project Editor, as shown below:

See Keyboard Entry for details.
2D Layout
The main portion of the Project Editor shows a 2D view of your circuit. By default, polygons on the present level are shown with an outline and a fill pattern, and polygons on other levels are shown using dashed outlines. This behavior my be changed using View > Polygon Fill and/or View > Options > Levels.
You may also view a 3D view of your circuit. See 3D Options for information on the options available for a 3D view.
Netlist Projects
This topic describes the Project Editor when used on a geometry project. Although not the main focus of Sonnet, the Project Editor may also be used to edit Netlist Projects. See Netlist Project Overview for more information.