Netlist Project Overview
Introduction
Netlist projects provide you with a powerful circuit analysis tool. Some examples of netlist applications are listed below:
- Combining Sonnet projects: You may use a netlist project to analyze and combine multiple projects. This is useful when analyzing large, complex circuits which require circuit subdivision for an EM analysis. You can manually subdivide your circuit, or use Sonnet's user-guided Circuit Subdivision feature (see Circuit Subdivision) to subdivide your circuit.
- Combining S, Y and Z- parameter data files: You may use a netlist project to combine multiple sets of S, Y and Z-parameter data files. This is particularly useful if you wish to combine results from another vendor’s software or measurement data with Sonnet results.
- Inserting modeled elements into a geometry project: Modeled elements, such as resistors, capacitors, inductors and transmission lines, can be combined with geometry subprojects and S, Y and Z-parameter data files.
Definitions: Netlists and Networks
Network: A network is a list of electronic elements and the nodes to which they are connected. It provides a map in which the ports of individual elements are connected to the ports of other elements by the use of nodes. Each node has a unique number and two elements sharing the same node number are electrically connected together.
Netlist: A netlist is one or more networks. If a netlist contains just one network, a netlist is identical to a network. In some netlists, a single network may be used multiple times in the same netlist.
Netlist project: A netlist project contains a netlist plus additional simulation information such as frequency and/or parameter sweeps. Circuit theory is used to simulate a Sonnet netlist project, resulting in a very efficient analysis.
An Example
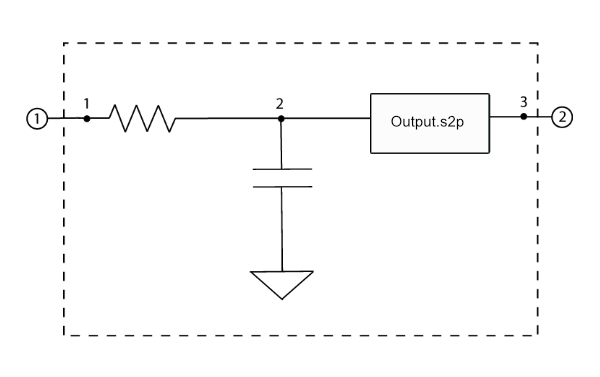
As an example, let's say you wanted to connect a data file to a resistor and capacitor as shown in the picture below. In the picture, nodes are represented by the numbered black dots.

The corresponding netlist project is simply a list of these elements, as shown in the netlist pictured below.

The first number after the name of an element is the network node which corresponds to port 1 of the element, the second number is the network node which corresponds to port 2 of the element, and so on, for all the ports of an element.
An explanation of each line in the netlist is given below, assuming the default units of ohms and pF:
- Nodes 1 and 3 correspond to ports 1 and 2 of the network called example_net.
- A 75 ohm resistor is connected between nodes 1 and 2.
- The two-port data file Output.s2p is connected between nodes 2 and 3.
- A 0.23 pF capacitor is connected between node 2 and ground.
The example att contains several netlist projects which may be accessed using the Example Browser.
Creating a Netlist Project
To create a new netlist project, select File > New Netlist from the main menu of the Project Editor or the Session tab.
The initial netlist file contains a default two-port network named Net. The last network in the netlist is the main network. The main network is the network whose solution you are solving for in this netlist. When you analyze the netlist, the response data produced in the analysis is for the main network.
You add elements to your netlist by using the Insert menu or the buttons available in the Tools toolbar as shown in the table below.
| Button | Command |
 |
Insert Modeled Element |
| Insert Project Element | |
 |
Insert Data File Element |
 |
Insert User Model Element |
 |
Insert Network Element |
 |
Create new Network |
To edit the attributes of any item in the Netlist, first select it, then select Object > Edit Element. Alternatively, you can double-click any item in the netlist to edit its attributes.
EM Options
You may use Circuit > Settings > [EM Options] to set the following options:
Push frequency sweeps down to all subprojects: Netlist projects may include Project Elements which could contain frequency sweeps that are different from the Netlist frequency sweeps. When this checkbox is selected, the EM solver automatically analyzes all Project Elements using the same frequency sweeps as the netlist. If this option is not selected, the subproject uses its own frequency sweeps. If the netlist project contains an ABS sweep, then the ABS sweep is pushed down to all subjects, regardless of this setting. This option is selected by default.
Enable Enhanced Resonance Detection: See Enhanced Resonance Detection.