Options (Keysight ADS Interface)
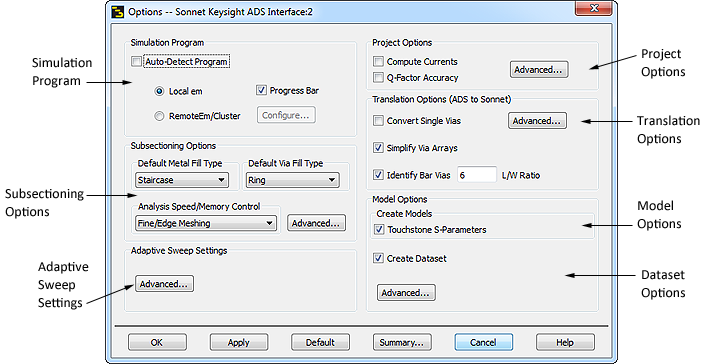
The Options dialog box, shown below, allows you to choose your simulation program, control your subsectioning options, control your adaptive sweep settings, set analysis run options, control your translations options, choose what type of model you wish to calculate, and control the creation of datasets. Select Sonnet > Setup > Options > All Options to open the dialog box.
Simulation Program
Sonnet allows you to run simulations on your own computer using a local copy of the EM solver, or to submit the job on another computer or even on a processing cluster. You can use settings in the Options dialog box to determine which processor runs the analysis.
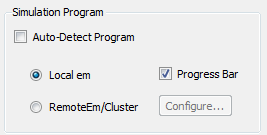
- Auto Detect Program: Selecting this option allows the software to determine the processor settings for Sonnet on your computer and submit the job to your default processing choice. If you wish to specify the processor, unselect this checkbox.
- Local em: Selecting this option runs your simulation on a locally installed copy of the EM solver. Note that if a local copy is not available, this option is disabled. If you wish to have a progress bar displayed during the simulation, select the Progress Bar checkbox.
- RemoteEm/Cluster: Selecting this option runs your simulation on a remotely installed copy of the EM solver. To configure a remote server, click the Configure button to open Sonnet’s analysis monitor in which you can configure a Remote Servers. For more information on configuring and running remote jobs, please refer to Remote EM Overview.
Subsectioning Options
This section of the Options dialog box allows you to control your subsectioning. The options are detailed below:
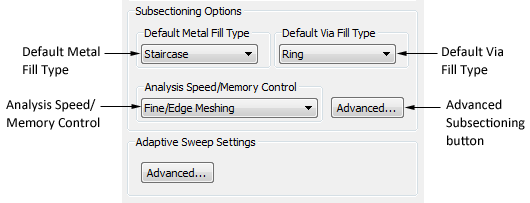
- Default Metal Fill Type: This field allows you to set the default meshing for planar polygons. For more information, see Meshing Models.
- Default Via Fill Type: This field allows you to set the default meshing for vias. For more information see the Meshing section of the Via Tech Layers topic.
- Analysis Speed/Memory Control: This field allows you to control the memory usage for an analysis by controlling the subsectioning of your circuit. For more information, see Speed/Memory Control.
- Advanced Subsectioning: Clicking the Advanced button that is to the right of the Analysis Speed/Memory Control group opens the Sonnet Advanced Subsectioning Options dialog box. See Project Settings and Tech Layer Settings for details.
- Adaptive Sweep Settings: Clicking the Advanced button allows you to change the ABS Caching Level.
Project Options
The Project Options sections contains the following options:
Compute Currents: See Compute Currents.
Q-Factor Accuracy: See Q-Factor Accuracy.
Advanced Project Options
Enabling the Advanced button opens the Advanced Project Options dialog box and contains the following options:
- Sonnet Project Comments: Any text you enter is saved in your project.
- De-Embed: This option is selected by default and should only be unselected by advanced users. See De-embedding Overview for more information.
- Box Resonance Info: See Box Resonances.
- Symmetry: See Symmetry.
- Enhanced Resonance Detection: See Enhanced Resonance Detection.
- Precision: See Precision.
- Additional Options: This entry should only be used at the direction of Sonnet Support personnel.
Translation Options
The Translation Options affect how the ADS layout is translated into a Sonnet project.
- Simplify Single Vias: This option places a bounding box on vias being imported and creates a rectangular via the size of the bounding box in place of the imported via.
- Simplify Via Arrays: This option locates via arrays and performs simplification to create one equivalent via in Sonnet to represent the via array in order to increase analysis efficiency by reducing the memory and processing requirements for the circuit. For a detailed discussion of Via Array Simplification, please see Via Array Simplification. Click the Advanced button in this section to access the options that control the via simplification process.
- Identify Bar Vias: This option is enabled when the Simplify Via Arrays option is selected. This option will identify bar vias when the length to width ratio requirement is met. Each via identified as a bar via will have its Meshing set to Bar during translation. Enter the desired minimum length to width ratio a via polygon must possess to be considered a bar via. For a detailed discussion of Bar Via Simplification, please see Bar Via Group Simplification.
Advanced Translation Options
To access the advanced translation options, click the Advanced button in the Options dialog box. You may also access this dialog box by selecting Sonnet > Setup > Options > Advanced Translation Options. Please note that the options in this dialog box are global settings which will override all other settings; hence, these options should only be used by an experienced user.
The various options are detailed below.
Process Stackup and Geometry Options
- All Thick Metal: All Tech Layers in the translated Sonnet project become Thick Metal.
- All Lossless Metal: All conductors in the translated Sonnet project become lossless.
- All Lossless Dielectrics: All dielectrics in the translated Sonnet project become lossless.
- Remove Unused Materials: Removes any defined materials that are not used in the translated Sonnet project. The only materials defined in the translated Sonnet project are materials used in the Sonnet project. If this option is turned off, all materials and mapped in the Technology File are translated.
- Mom. Thick Metal Expansion: When thick metal is modeled in Momentum, the dielectric associated with the thick metal is expanded to account for the thickness of the metal. The height of this expanded dielectric is the height of the original dielectric plus the thickness of the metal. This option is selected by default so that when the translation is performed, Sonnet behaves in the same manner as Momentum and expands the dielectric layer in the Sonnet project. If this checkbox is unselected, then Sonnet does not expand the dielectric layer during the translation.
- Mom. Keep Free Space: When converting from a Momentum substrate to a Sonnet substrate file (.matl), the top of the Sonnet box will be set to Free Space, instead of lossless metal.
- Merge Polygons: Merges any adjacent metal polygons with the same properties. If a polygon has another geometry element attached, such as a port, it will not be merged. This option is probably best used for the flow of a layout that has been generated from a schematic with MLIN, MCURVE, etc.
- Add Via Pads: Adds planar metal to the top and bottom of the via that is the same size and shape as the via polygon. The pad is modeled using planar metal with loss equivalent to the loss of the via metal being used for the via polygon.
- Lossless Extensions: Transmission lines are added in your translated Sonnet project which extend from the box wall to your circuit. If this option is selected, Lossless metal is used for the extensions. If this option is not selected, the extensions inherit their metal properties from the polygon to which the ports are attached.
- Model Vias as Solid: Selecting this check box will model all of your vias as solid. For more information on Via Metal Models and the “solid” setting, see Solid.
Via Array Translation Options
This section of the dialog box contains the options which control how the via array simplification is performed when a circuit is translated into Sonnet. For a detailed discussion of these controls, please refer to Via Array Simplification.
Model Options
The Model Options section contains the following options:
- Touchstone S-Parameters: Selecting this option instructs the analysis engine to produce an optional output file of S-parameters in the Touchstone format. The S-parameter file is placed in your ADS design along with a schematic view and layout view of the model and a model symbol. When you open the model schematic for viewing, the file information is displayed. For details on viewing your model, see the topic on using the models. You may also elect to save Y or Z-parameter data. See Advanced Model Options below.
- Create Dataset: Select this checkbox if you wish to create a dataset for your model that may be displayed in the Data Display window in ADS. Once the Sonnet analysis is complete, the dataset will be created and opened in the Data Display window in ADS. You may also create a dataset from the Sonnet menu in your layout window by using the Sonnet > Datasets > Create Dataset command. For more details on datasets, see Viewing the Results in ADS.
Advanced Model Options
Clicking the Advanced button opens the Advanced Model Options dialog box which allows you to determine what is included with the model created by the simulation. You may also access this dialog box by selecting Sonnet > Setup > Options > Advanced Model Options.
Symbol
You may specify the type of symbol you wish to use for the model: layout look-alike or black box. A layout look-alike uses a small graphic of your layout as the component symbol. The black box uses a small box with the I/O connections. Both types are shown below. Note that some colors have been changed for clarity purposes.

If you select the layout look-alike as your symbol type, then the controls below, which control the size and appearance of your layout, are enabled.You define the size in terms of a schematic unit. You may use either a layout unit or the minimum pin distance as the size and then enter the equivalent in schematic units. If you wish to add a ground reference to your symbol, select the Add Ref. Pin checkbox. If you wish to display the pin labels shown in the design from which this model was generated, select the Add Pin Text checkbox.
Touchstone S-Parameters Options
This section of the Advanced Model options dialog box allows you to select the type of data you wish to include in your optional output file.
- High Precision: Selecting this checkbox outputs high precision (16 significant figures) data.
- Include Adaptive Data: Selecting this checkbox includes all the discrete data and adaptive data from an ABS analysis. If you wish to only export the discrete data points, unselect this checkbox. The checkbox is selected by default.
- Include Comments: Selecting this checkbox includes any comments from the project in the S-parameter file.
- Parameter: Select which type of parameter: S-, Y- or Z-parameter you wish to output from the drop list.
- Complex: The response is a complex number composed of two parts. You may select what those two parts represent by selecting a choice from the drop list.
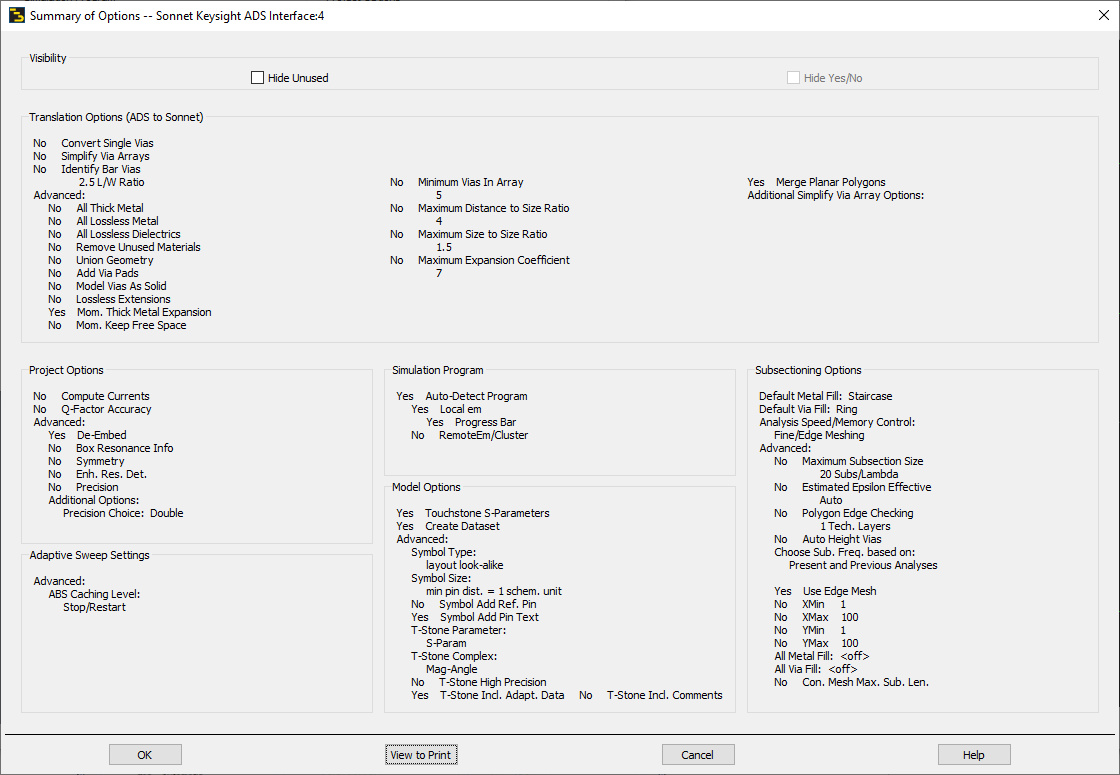
Summary of Options
You may view a summary of all the settings being used in the interface by selecting Sonnet > Setup > Options > Summary of Options. The Summary of Options dialog box is opened on your display as shown below. By default all possible options are displayed. If you wish to display only used options, select the Hide Unused checkbox at the top of the dialog box. A Yes or No appears before each option to indicate if the option is being used (this is useful if you are displaying unused options). If you do not wish this text to appear in the dialog box, select the Hide Yes/No checkbox. You may also click the View to Print button at the bottom of the dialog box if you wish to print the summary.